 White
White
 Pink
Pink
 Red
Red
 Orange
 Ivory
Ivory
 Yellow
 Gold
Gold
 Brown
Brown
 Green
Green
 Blue
Blue
 Purple
 Grey
Grey
 Black
Black
 Multi
Multi
 Abstract
 African Print
 Animal Print
 Baby & Nursery
 Buffalo Check
 Camo Print
 Celestial
 Church
 Damask
 Embroidered
 Floral
 Geometric
 Gingham Check
 Houndstooth
 Licensed
 Paisley
 Plaid
Plaid
 Polka Dot
 Sports
 Stripe
 Tie Dye

Bags may seem like a big and scary sewing project, but they aren’t as difficult as you may think. I’m speaking as a complete amateur, here – I only started sewing a few months ago. This hobby started because my boyfriend began woodworking and created this amazingly intricate and beautiful chess set. Once he was done, I looked at it and thought “Hey, I want to be good at something!”. And, because I needed to get a gift for my mom’s 60th birthday, I chose to take up sewing. After I improved my skills on a few tote bags this summer, I decided to try something a little more intricate. So here we are with the weekend duffle bag.
Warning -- this tutorial may be a little different than the others! Because I am new to sewing, there could absolutely be better ways to get this done. I will say though -- I took this bag out for a spin on a weekend trip to NYC and it held up just fine. So if you chose to follow this tutorial, it could be one successful example of the blind leading the blind


Supplies:
- 1 yard vinyl (I used leather brown)
- 1 yard waterproof canvas (I used maroon)
- 1 yard cotton broadcloth (I used yellow)
- Interfacing
- 26” zipper
- Scissors, clips and everything else you need for a sewing project
Time:
6-8 hours
Difficulty:
Medium
LET'S GET STARTED!
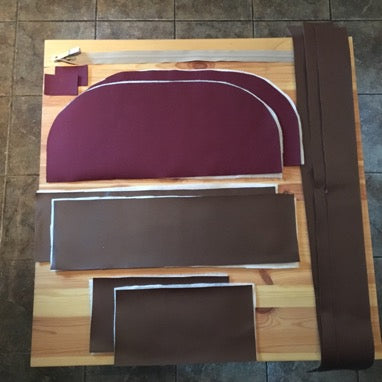
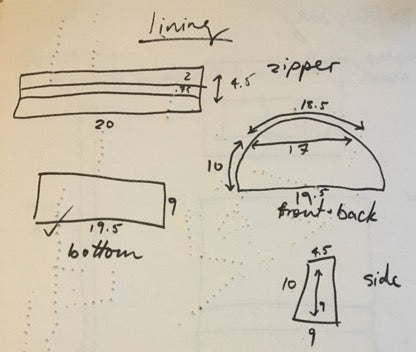
- To begin, draw out all the pieces in a notebook and add in the dimensions needed. Then, once you’re set, begin cutting two sets: one with the canvas/vinyl pieces, and one for the interfacing. This is likely the most time-consuming step, so don’t worry if it takes a while! (Note for my project: my actual changed because of how the bag actually turned out. I ended up cutting a bit off the top of the side pieces to accommodate the zipper and also to accommodate a few mistakes. Change as you see fit!)
- Once everything is cut, the first pieces you want to sew together are the sides. These are the pieces with vinyl on bottom and canvas on top. Place the pieces with right sides facing each other. Clip together and sew. Everything for this bag was done with a 1/2” seam allowance.


- Do the same with the front pieces.

- In order to made it lie more flat, top stitch the seam so that the extra bits of fabric lie flat against the main piece.


- Once all 4 side/front pieces are complete, it’s time to join them together! Line up a front piece with a side piece with right sides together. Sew vinyl parts together, and into the canvas until the pieces no longer match up (curve side of the front piece with straight side of the side piece). This is so that you will have room to sew the zipper top piece on after. Do the same thing with the other 2 pieces, and then sew together. Once you finish this step, you should have a completed rectangle.


- Making sure your rectangle is wrong side facing out, clip the bottom piece in place. You can do this one side/front piece at a time, or all together. Sew with a ½ seam allowance. Once you get to the corner, put your sewing needle all the way down, lift the foot and pivot the fabric 90 degrees to start on the next side.


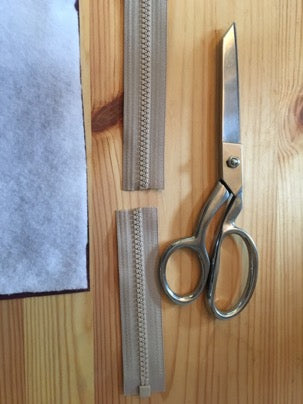
- Now that you have the main part of the bag done, it’s time to work on the zipper. Take your two long canvas piece, complementary interfacing and zipper and put together. Measure how much zipper length you want for this bag, and cut off the rest.

- To make the zipper ends, clip ¼” of the pieces together (right side facing out). Sew. Do for the other end as well.


- Place on the end of the zipper and clip. Sew over the zipper and do the same for the other zipper end.
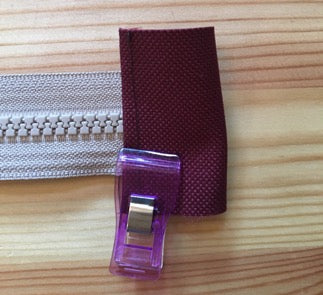

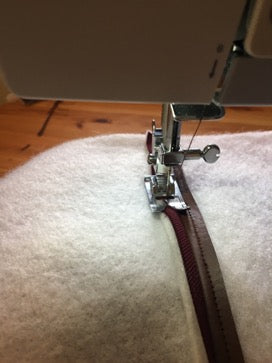
- Next, place a long canvas piece (with interfacing) on the zipper. Make the tops match, with right sides facing together. Sew, and do the same with the other side. Do a top stitch on both so that the fabric lays flat.


- Take the completed zipper top piece and sew the ends to the top of the side pieces. The sewing line should fall a little beyond the zipper. Cut off excess side piece fabric as necessary.

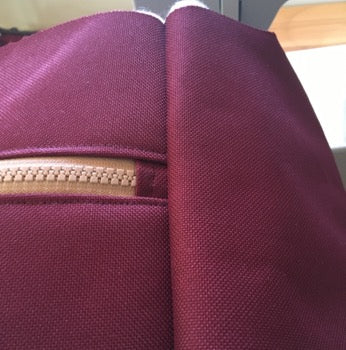
- Next, clip and sew the front pieces to the zipper top piece. Because the front piece is slightly curved, there will be waves in between clips. Don’t worry, and just go slowly while sewing.


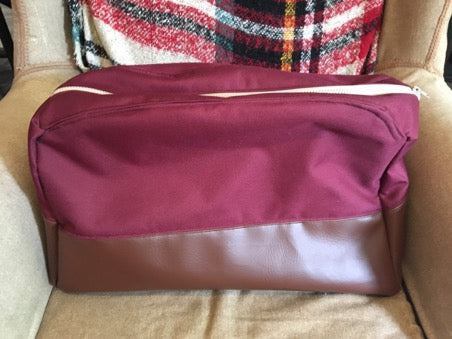
- Top stitch that seamline to make it lay flat. Turn bag inside out. Congratulations! The main part of the bag is done! Might be time for another drink.

- Now it’s time to work on the super fun straps. For this part, place two long strap pieces together, clip, and sew with just over a ¼” seam allowance.

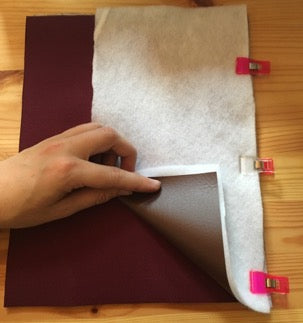
- This may seem crazy, but it’s time to turn it inside out. Use that elbow grease and slowly pull it along. I found it helpful to pull with my hand like this:

- Once the straps are inside out, do a top stitch close to the edge. Fold and sew the edges.


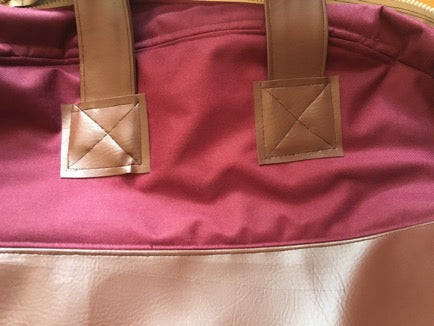
- To make it look a little cleaner, you can add little patches of vinyl over the places where the straps connect to the bag. For this step, take your four vinyl squares and place them on top of the strap ends. Measure where you want the straps to connect to the bag (mark it with a washable marker if needed!). Open the zipper of the bag and sew in a x & box pattern. Do the same with all four ends and squares.


- Wipe the sweat from your forehead and take a look at the [almost] finished bag! It might also be a good time to clean up the path of destruction that you have undoubtedly collected by now.


- For the final part of this bag, you need to make the lining. I waited until the outside part was finished until measuring this part because some dimensions had changed while making the bag. Measure the dimensions of your bag, add 1.5” to each measurement to account for seam allowance and mistakes, and cut out the pieces of your lining.
For the top zipper piece, measure as if the zipper is not there. Cut a line down the middle for the length of the zipper, make two cuts at the ends, and fold in so that there is an opening for the zipper.
Sew all your pieces as you did with the outside of the bag. Make sure that the right sides are facing each other, contrary to what you did with the main part of the bag.
- If you want to add some pockets, take a rectangle piece of canvas, fold it in two and sew down the middle. This is so that the top part of the pocket is smoothly folded over. Sew the sides and bottom to the lining.

- Clip the lining on the inside of your bag and hand sew it in place. (Or machine sew as much as possible and hand sew the rest.)

- Finally, admire this monster of a bag that took only 45 minutes to make (ha just kidding). Good work! Go out, travel, and enjoy your adventures with it!


1 comment
Julie Lovrien
I like the looks of the bag. You could make it any size you wantedw. Thanks!
I like the looks of the bag. You could make it any size you wantedw. Thanks!