 White
White
 Pink
Pink
 Red
Red
 Orange
 Ivory
Ivory
 Yellow
 Gold
Gold
 Brown
Brown
 Green
Green
 Blue
Blue
 Purple
 Grey
Grey
 Black
Black
 Multi
Multi
 Abstract
 African Print
 Animal Print
 Baby & Nursery
 Buffalo Check
 Camo Print
 Celestial
 Church
 Damask
 Embroidered
 Floral
 Geometric
 Gingham Check
 Houndstooth
 Licensed
 Paisley
 Plaid
Plaid
 Polka Dot
 Sports
 Stripe
 Tie Dye

A DIY Dark Magician Girl Cosplay Sewing Tutorial
Dark Magician Girl has and will always be one of my favorite cards from Yu-Gi-Oh! Now, as a child I was more impressed by her impressive battle skills and colors. But as I got older, I was more drawn to her simple yet intricate character design and color scheme that kept her essence as a magical girl.
Recently, I revisited my Yu-Gi-Oh days and I absolutely knew I had to bring Dark Magician Girl to life by cosplaying her! This step-by-step tutorial focuses on showing how you can also bring to life your own Dark Magician Girl Cosplay for your next Convention or Photoshoot in a matter of 7 hours!
Character: Dark Magician Girl
Series: Yu-gi-oh
Supplies:
- Scissors
- 6 yards ITY Stretch Jersey in Turquoise from FabricWholesaleDirect
- 3 yards of ITY Stretch Jersey in Pink from FabricWholesaleDirect
- Measuring tape
- Yoga mat or any thin foam
- Gold Paint
- Pink and Blue Heavy-Duty thread
- Ball Point needle for sewing machine
- Velcro
- Pattern
- Elastic
Time: 7 hours
Difficulty: Intermediate
Measurements that you’ll need:


**To get these measurements, lay your arms down flat at your side and have someone measure around your shoulder or where you would like the rectangle piece to sit.
Front Arrow (x1) for Dark Magician girls front Arrow
**Repeat the same measurements for the Back Arrow except for the length, you’ll need to measure from upper shoulder to upper thigh to get the correct length.

**To keep up with everything, I recommend labeling the foam pieces
Below is a checklist for you to use to make sure you have everything correct!
- Braces (x2)
- Front arrow (x1)
- Shoulder piece (x1)
- Skirt(x1)
LET'S GET STARTED!
PART 1: Base Suit
Now that you have the top portion of this blog complete, we can move forward in creating the base suit! Using the Pattern B4652 Butterick, we are going to focus on using the pattern for ‘Style C’ to get the base of Dark Magician Girl's outfit. Cut out the respective pieces for the suit and lay them down on the fabric!

-
Lay the front piece of the pattern on the seam! When cutting this out, you are going to cut it without any seam allowance added! This is because the pattern already includes 3/8 seam allowance!

-
Once cut, open up your pattern to make sure the piece is cut evenly and the shape is correct. After that, slide the piece aside because now we’re going to move on to working on the back piece!

-
Regarding the back piece, we’re going to do a bit of pattern editing and actually close in the opening of the suit! *Note: I used my front bathing suit pattern to make the back due to losing my original back piece* However, everything still applies! Follow your pattern, but you’re going to want to close up the back of the suit rather than having a dipped back!

-
After cutting out both pieces, lay the fabric pieces down and start pinning the suit! My suit ended up being a bit larger than I needed it to be, so above you can see how much I took in for the actual suit! If you must take in your suit and want it to be more skin tight, I recommend taking it in slowly by starting from the outer skirts of the suit like I did and then slowly taking it in until you’re satisfied with the fit! Then sew on your sewing machine with a ballpoint needle!

-
Next, turn your suit inside out because we’re going to add elastic onto the leg opening of your suit! *Note: You don’t have to do this, but this adds more security for your suit and also creates a neat look * Lay the Elastic down onto the outer rim of the suit and take your fabric and “Roll” it over the elast and pin the elastic and fabric in place! Do not stretch the elastic as you do this, instead let the elastic lay naturally onto the fabric. When you sew the elastic and fabric together you’re going to want to do a Zig Zag Stitch to hold the fabric, and allow the Elastic to stretch if needed!

**Below are examples of how the suit should look from different angles!**
*Close up of the elastic and the inner parts of the suit*
*This is how your suit should look when you have everything pinned and ready to sew! -
After sewing the bottom part of your suit, take the time to hem the top of your suit! Sew the top with a Zig Zag Stitch to clean up the edges!

Rememeber to try on the suit to make sure everything fits correctly, but after finishing your suit, its time to move on to the bigger accessories of the base suit!


PART 2: Accessories
The Shoulder Piece:
-
Refer to the measurements taken at the beginning of the tutorial! For your rectangle piece you’re going to need a helper measure your shoulder all around while laying both of your arms at your side. After determining the length, you then must determine how thick you would like your shoulder piece to be! My shoulder piece was at a length of 43 inches long and 4 inches thick! *Note: Make your thickness an even number! This is just easier for the next step*

-
Cut the Foam rectangle out and fold it in half! Keep the foam folded by pinning and/or clipping the foam!

-
Then slowly sew the foam with your sewing machine. Do not switch the needle to a heavy duty needle. This is just due to how thin your foam is, but instead turn your tension on your sewing machine down to 4, and slowly sew the foam piece together

-
Once sewing the rectangle piece, lay it down onto your blue fabric and fold the fabric over the foam piece! Flip the fabric outside in. Then pin the outer most fabric together, and sew. Leave the middle of the fabric open, and do not sew that part. After sewing slip the foam out and flip the slip outside out

-
Slip the foam back in to the slip. This part will be a bit difficult due to the size and length of your foam piece! However, use the open middle part the fabric to help pull the foam through the fabric. Once you do that, then your covered rectangle should look like this!

-
OK! So, now it’s time to line your shoulder piece! In order to make the bias tape, use the pink fabric and lay it on your rectangle piece. Lay about 2 ½ inches of pink fabric down to cover the top of top of the rectangle like in the picture. Remember to pin the fabric down to the foam, and then separate the pink fabric from the main fabric you have! **Note:The black line gives you an idea of where to sew*. Sew about an ½ to and inch in. Then fold that fabric over and top stitch the fabric to hold the backing!

-
Next, Bias line the sides of the shoulder piece by repeating the same technique! After completing that, Push the shoulder piece aside and move on to working on the Braces, and Arrows, and Triangle Piece!


The Front Arrow, Braces and Bottom Triangle:
-
Use a ruler to draw a straight arrow, while also taking the measurements you prepared in the beginning of the tutorial! Duplicate the same measurements and shape onto the blue fabric as well and pin those two together. Do the same for all the other foam pieces and remember to mark the foam with the name of the piece as you go.
Once you have those pieces, top stitch the edge of the fabric duplicates and the corresponding foam pieces together!

-
The Foam piece will look something like this after Top Stitching the fabric onto the foam pieces! Cut off all excess fabric and then prep Bias tape to line the Braces, Triangle and Arrow!

-
Bias Lining the Arrow is very difficult, but above shows the order from Left to Right as to how to line the arrow. Start with the inner corners, Next move to the outer parts of the arrow and then finish up by lining the longest parts of the arrow, and then close the top part of the arrow with bias tape!

-
Once everything is lined nicely your pieces should look something like this! Then it’s time to add the Velcro Attachments to the base pieces like the Arrow, and Brace Piece and Triangle! Make sure to do a fitting, so you’ll know where to place your Velcro on your suit, shoulder piece and braces.


PART 3: The Skirt
-
Lay out your fabric, and see how much you have left! Then take the measurements from around just where your hip bones sit and multiply that number by 2! The number you get will be the length of fabric you’ll need to cut. Then measure from your Hip bones and down to determine the length of the skirt! After that, if you have an erasable marker or even tailors chalk mark those measurements onto the fabric.

-
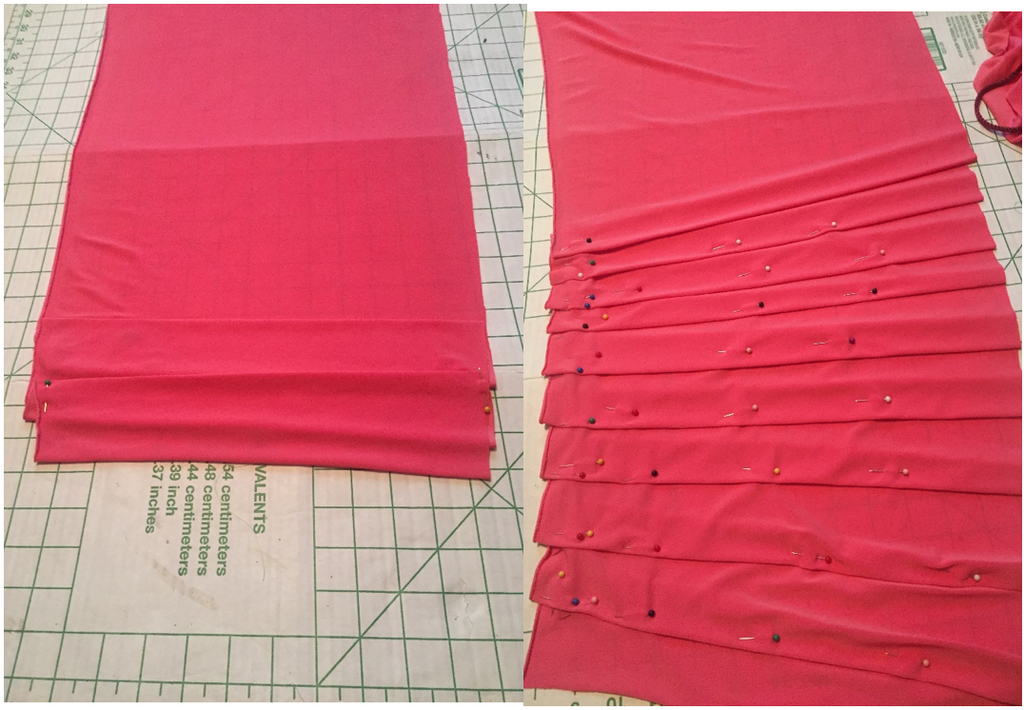
Cut the fabric according to the measurements. After doing so, you should get a rectangle shape for your fabric. Before moving on, remember to hem your skirt if you have any rough edges.

-
Lay out the rectangle pink fabric and begin to fold the fabric as evenly as possible to make “Pleats” As you do this, continually pin the fabric and keep it as straight as possible! After pinning everything completely then, take the fabric underneath the sewing machine and slowly sew the skirt together!


Once this is all completed, it's time to put everything together! You can add on additional accessories such as props to bring the outfit more alive. Your final product should look like this!


1 comment
Marrissa
A very nice job. Dark Magician Girl is one of my favorites as well. Thanks for sharing! :)
A very nice job. Dark Magician Girl is one of my favorites as well. Thanks for sharing! :)